Skip to content
Snippets Groups Projects

Working From Home: Using sshfs to mount ece391_share folder

  • Clone with SSH
  • Clone with HTTPS
  • Embed
  • Share
    The snippet can be accessed without any authentication.
    Authored by Fang Lu
    Edited

    Disclaimer

    This tutorial is purely based on my own experience. It is not guaranteed to work on arbitrary setup. The setup is moderately complex. By trying this tutorial, you agree that I am not liable for any damages such as but not limited to devel vm malfunction, data losses and system being compromised.

    If you are setting up the working from home environment on a Mac or Linux, and got stuck trying to mount the ece391_share folder through smb/cifs due to some issues with SMBUp or smbd, you can try to mount the shared folder using sshfs rather than samba. Sshfs operates as a FUSE virtual filesystem that converts a SFTP connection into a mounted folder, therefore it is free of samba issues such as weak authentication protocols, protocol mismatches, missing permission attributes, etc. When configured correctly, sshfs works more reliably and securely than samba.

    Installation

    The following steps are in devel. Commands in this section requires root permissions. Login as root or type sudo -s to switch to the root user.

    The devel VM does not have sshfs preinstalled, but luckily it is readily available from the yum repository. To install, run

    yum install fuse-sshfs 

    In practice, due to some weird quirks of the devel VM, yum might get stuck after downloading the metadata XMLs. If yum has been stuck for a long time, force-quit yum and run the command again. It should pick up from the killed point and continue. If Ctrl-C does not work, press Ctrl-Z, and issue the following commands (necessary! yum is not killed yet by Ctrl-Z)

    killall -sKILL yum
    fg

    You should see something like [1]+ Killed yum install sshfs. Then issue the yum install command again.

    When yum says Parsing package install arguments, it should be safe and no more kills are needed. Wait for it to collect the necessary information. Enter 'y' when yum asks if the download size is ok. Then wait for yum to get the rest in place for you.

    To verify the installation is successful, type sshfs -V and it should print out the relevant version information.

    Configuring SSHFS

    The following steps are in devel. They also require root permissions.

    Before you can use sshfs, several settings need to be tweaked so that things work smoothly.

    1. allow_other

    FUSE, by default, restricts access to the owner only. Even root cannot access a volume mounted by a different user. To allow overriding this behavior, modify /etc/fuse.conf by running:

    vi /etc/fuse.conf

    The file might not exist. That's fine, just create a new one. In the file, put the following line, or make sure the following line is uncommented:

    user_allow_other

    Then save and exit your editor

    2. Add user to group fuse

    Unprivileged users do not have access to fuse apis. To allow user to run sshfs, use the following command to add user to the fuse group:

    /usr/sbin/usermod -a -G fuse user

    3. Allow user access to workdirmain

    Obtain ownership of /workdirmain, or mount will fail with EPERM. Also unmount workdirmain if previously mounted.

    umount /workdirmain
    chown user:root /workdirmain

    Configuring Host Machine

    Now switch back to your host machine. You must configure a SFTP server on your host machine to serve that shared folder. Typically, you just need to make sure that an SSH server is running on your host system.

    Security Concerns

    Running a SSH server will allow remote login to your computer. Your system will be protected by your password only. It is highly recommended that you use strong passwords for ALL accounts on your machine, or disable password login in your sshd_config and use public key instead (Google for instructions on your OS). You may also use a firewall to prevent connections to your SSH port (22) from external network interfaces (also use Google, it is going to be some complicated commands).

    Seriously, there are many attackers on the Internet trying to crack your SSH with known weak passwords all day. You can see that in the auth log if you have ever operated a server. If you use some password like 12345 or P@ssw0rd you are DEFINITELY going to be compromised.

    macOS

    This should be the most common case. Surprisingly (or not surprisingly since macOS is actually BSD) macOS has ssh server pre-installed. Follow the steps to activate:

    1. Open System Preferences
    2. Go to "Sharing"
    3. Tick "Remote Login" (NOT remote management)
    4. Click on "Remote Login", make sure access is enabled for your account

    PS: Why not File Sharing? File Sharing is actually AFP+SMB, but the SMB macOS uses enforces a strong authentication protocol. The protocol is not supported by devel.

    Linux

    If you are using Linux, you probably know how to get sshd up and running. It's something like apt-get install openssh-server or the equivalent on your distro.

    Windows

    Not supported. Google if you want to try.

    Connect!

    Now back to your devel, as user, not root. You probably want to make a shortcut so that it gets done automatically.

    In your home folder (or wherever you prefer), make a text file as your shortcut:

    vi mntssh

    In the file, put the following contents

    #!/bin/bash
    if [ ! -d "/workdirmain/work" ]; then
    sshfs -o allow_other,default_permissions,workaround=rename your_username@10.0.2.2:/path/to/your/ece391_share /workdirmain
    fi

    Note: if you are copying by hand, be extra careful with the spaces. You can also download the above text in your vm with wget https://gitlab.engr.illinois.edu/-/snippets/79/raw -O mntssh

    Replace your_username with your username on the host system (use command whoami on your host OS if not sure). Replace /path/to/your/ece391_share with the path to your ece391_share folder. The path could be either absolute or relative to your home folder.

    Save and exit your text editor, and make the file executable by running:

    chmod +x mntssh

    Almost done! You can already try to connect by running ./mntssh. You should be asked for your login password like you are ssh-ing into the machine. Then, if everything went right, nothing will be printed, and you will be able to see your files in /workdir!

    Now the last step, edit bashrc so that mntssh script runs automatically upon login:

    vi ~/.bashrc

    Remove the line that reads /root/mntdrives, so that the system will no longer try to mount the CIFS share. Add a line that calls your mount script to use that instead:

    ~/mntssh

    Also modify the bashrc for root.

    Now you are all set! Cd into your shared workdir and start working. Also make a copy of your disk image, so that in case you screwed up and need to redo mp0, you can start from this backup and skip all the steps above.

    For people working on MP1: You do not need to repeat this entire thing in test_debug. Go to ece391_share/work/vm and copy devel.qcow to test.qcow (with devel fully halted).

    Optional Settings

    Public-key authentication

    You can make the mounting process even simpler by configuring ssh to securely skip the password prompt using public-key login.

    In devel, run

    ssh-keygen

    Use the default location and do not provide a passphrase for the private key. (Yes, your private key will be unprotected. Make sure that you secure your system so that files in the vm are not accessible. If someone obtained your private key file, they can login to your system as if they have your login password)

    Get the contents of the public key in devel:

    cat ~/.ssh/id_rsa.pub

    Copy that into your host machine's authorized keys:

    vi ~/.ssh/authorized_keys

    It's ok if the file (or the .ssh directory) does not exist. Just create them.

    Now try ssh your_username@10.0.2.2 in devel, and you should be able to get in without any password prompts.

    Public-key authentication reversed

    This is kind of unrelated to this tutorial, but if you swap the host machine and the virtual machine in the steps above, you can skip the password prompt when you ssh into devel from your host machine. Copy your id_rsa.pub on your Mac/Linux into the authorized_keys in devel and you will no longer type "ece391" during ssh login.

    fstab

    This is unnecessary for most, but for those who know fstab and feels uncomfortable with emulating start-up mounting with bashrc (since the drive is not mounted until you login), sshfs can also work with fstab:

    1. You must setup public-key authentication from the VM to your host AND make sure your private key is not password-protected for sshfs to work non-interactively
    2. You probably know what the command in mntssh is doing. Refer to this post for the fstab syntax for sshfs.

    Troubleshooting

    fuse: failed to open /dev/fuse: Permission denied

    Make sure you have done the usermod -a -G step. Logout and login again.

    Run the command id, you should see something like uid=501(user) gid=501(user) groups=101(fuse),501(user)

    /workdir: No such file or directory

    If you encounter this error trying to cd into /workdir after sshfs command succeeded, then you might have specified the wrong folder. Try cd into /workdirmain, if you can do this then mount is successful. Inspect the contents of /workdirmain to see if you provided the wrong folder in your mount script.

    If you can cd into /workdirmain/work but not /workdir, likely that the symlink is missing. You can easily fix it with the command below

    sudo ln -sf /workdirmain/work /workdir

    fuse: mountpoint is not empty

    /workdirmain is already mounted. It could be the CIFS mount or a previous call to sshfs. You can get more information about mounted volumes by invoking mount. To force a remount, first unmount workdirmain by invoking umount /workdirmain.

    xxx: Permission denied

    There might (or might not) be issues if the uid of user in devel is different from the uid of your user on the host machine (especially on Linux). To check, execute the following:

    ls -l /workdir

    If you see something like -rw--r--r 1 user user then the uids are the same. But if you see something like -rw--r--r 1 1001 1001 then it means that the files are mounted as user 1001 and group 1001 and you might need to change your uid in devel:

    sudo /usr/sbin/usermod -u 1001 user
    sudo /usr/sbin/groupmod -g 1001 user
    sudo chown -R user:user /home/user # Might not be necessary, run if you still encounter issues

    Logout and login again, you should now see the files owned by user:user under workdir.

    xxx: transport endpoint not connected

    I have seen one case of this issue and the exact caues is not known. If this happens and you observe that your workdir is gone, please try to mount it again.

    ~/mntssh

    If this command somehow fails, unmount the mountpoint and try to mount again

    sudo fusermount -u /workdirmain
    ~/mntssh

    Let me know if you have other trouble, I will try to resolve them and update this list

    • kunleli2 @kunleli2 ·

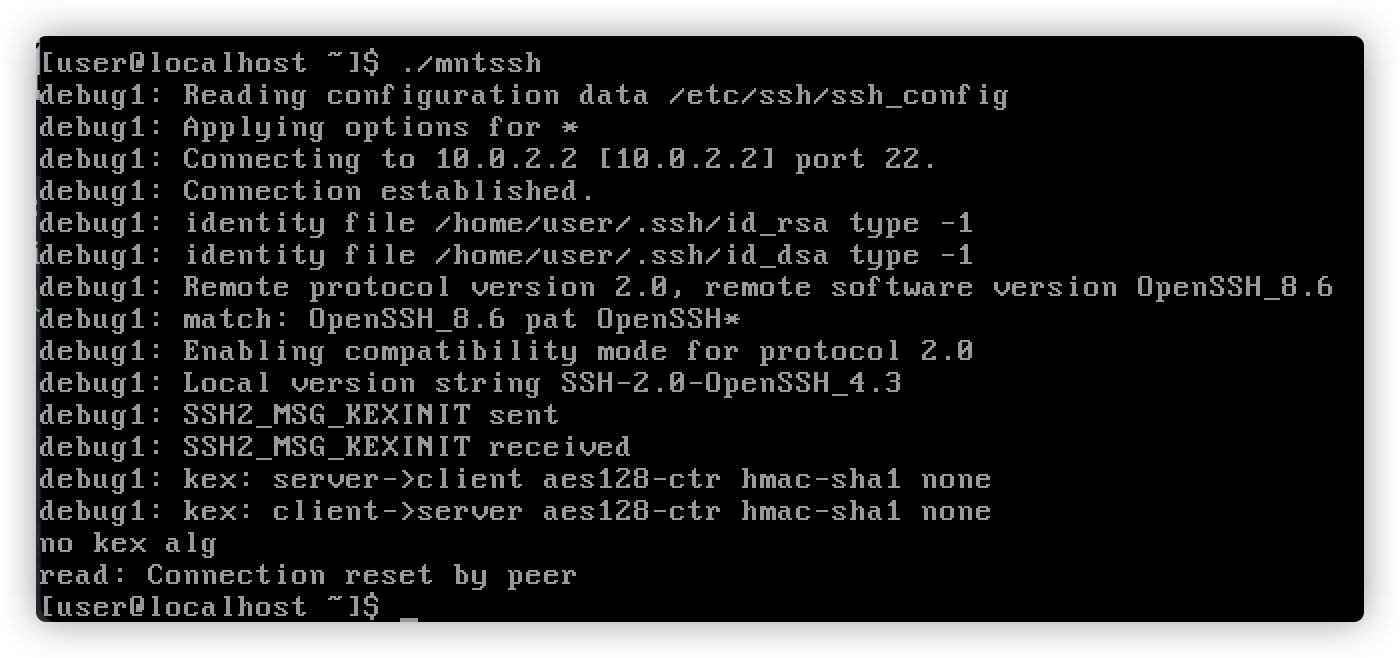
      I'm running on my Mac and everything went smoothly until I ran ./mntssh, which gives me an error as below. Could you please tell me how to fix this? image

    0% Loading or .
    You are about to add 0 people to the discussion. Proceed with caution.
    Finish editing this message first!
    Please register or to comment